Sunday, September 11, 2016

Leave The Stress, Take the Paints

The Rare 4 Day Weekend Getaway

At the very last minute, we decided to leave town for the 4 day weekend (time off is so rare). The weather was nice & we live near beautiful drivable scenery - lucky us! I deliberated taking my paints on this short jaunt, but I am glad that I did.
Old Mission Point, 9x12


Our first day, we walked through town, had breakfast and then decided to take a drive up to the old lighthouse. We didn't exactly know what to expect, I had hoped to paint the lighthouse but it was surrounded by trees! I took some pictures anyway, but there was no great spot to set up and paint. The sandy shore in front of the lighthouse was low and full of mid-day sun -- not the best circumstances. However, off to the left of the sunny shoreline, was a nice shady spot, close to the water with a lovely peninsula vista against a dreamy blue sky. We followed a path through the woods to the car, gathered our beach chairs and my painting gear. The weather was 70's, sunny and breezy with low humidity - comfortable!

I set up my paints while my husband sat with me in the shade and read. It was quiet and we were able to relax on the shore, not too far from the lighthouse, undisturbed. We had two delicious hours of calm meditative reading and painting. I was very thankful that I had brought my painting gear on the trip.

Betsie Bay, 9x12
The next day was busy! We had breakfast, read the paper on the front porch, walked to the Farmers Market, shopped downtown a bit, visited an art studio and post-lunch decided to find a place to paint! The weather was still lovely 70s breezy but the beach was too sunny, no shade at all. We ended up at the park under shady trees, the trees were close to the street with a view of the bay. We parked very close to where we would set up-- a plus. Again my husband read while I set up and painted for a few hours in the late afternoon.

My "Vaca Takeaway" was that somehow even with a busy schedule, I found time to paint several hours each day. Preparation was key - I had the supplies in the car and it was relatively easy to pick a place and set up! Of course the weather cooperated, but after this adventure, I encourage you to take your paints with you!


Thursday, August 25, 2016

Hard Work - Behind the Scenes

Art Show Prep

White Mats!
Recently I completed some sweet little paintings, I call them my Bathing Beauty Series. They would look great in a Master Bedroom or bathroom. They are little 8x6" Acrylic Inks/Watercolor blocks on watercolor paper.


Art affixed to mat with mount strips.
Since I have a show at a gallery in September, I wanted to put these little Bathing Beauties in an art bin for sale. I had no idea how much work it would be to get them ready for the show...


Plastic Seal Bag -to put art in.
First I had to purchase all the materials to put them together:

  • 8x10 mats
  • 8x10 foam board
  • Plastic Seal to hold artwork (Krystal seal)
  • Archival Mounting Strips - to tape artwork to mat
  • Rectangle labels, Price stickers
  • Business Cards


What a Process:
I had to sign my work.
Then I had to put the mat on the work and then use Mounting Strips to tape the work to the mat.
Then I put the foam board and the mounted work into the plastic seal.
Next I had to put the Business Card in the back and figure out labels.
I found some labels at Target and on each label I put the Art Name and Size. And, I put a Price sticker.

Now repeat the above process for each work!

Whew! But I do love how each work looks now - so professional!
The final polished product - wowza!
(teal box added to blog image to cover nude figure)

Please stop by Lawrence Street Gallery this September to see the Bathing Beauty Series in person!


Saturday, August 20, 2016

"Pause" To Be Thankful

Gratitude for Good Friends

My current plein air set up - cheap field easel and all...
And the quest for better equipment

In my opinion, the most valuable asset for artists is other artists. Making art is very often an independent and solitary process which can be tough and isolating. Forming art friendships is one of the most important things that an artist can do for herself. Art friends are willing to talk with you about art and about the complexities of making art. Art friends listen when you ask questions and talk about frustrations; willing to offer critiques and advice. Making art without an art community would be most difficult to do.

Initially, for a few group plein air sessions, I bought a cheap french easel - not planning to paint much outdoors. However, I now want to do more plein air which means that I want a better easel. My $50 french easel works fine and has stood up to wind rain and cold. However, it is a HUGE pain to set up. And I have been caught in the rain trying to unscrew it and take it all down--me and my equipment getting drenched.

Recently I have been researching better plein air easels, starting by asking art friends what they use and endorse. The Artists who do the most plein air painting all highly endorse the Soltek -which is pricey but easy to set up. Good plein air easels are costly-much much more expensive than my little cheapo easel. After I save up, the next big question is how do I choose what is best for me? I want equipment that I like in the field and that will endure for years. Having painted outside, in breeze and wind, a sturdy set up is a must. And lighter weight (since I don't Crossfit) would be a big plus. In doing my online research, I created a plein air easel comparison spreadsheet. I narrowed down my options and sent my spreadsheet to my art friend for her review.
Borrowed easel, easy setup

The next day we had an art session together and she brought one of her old plein air easels. Not only did she show me the Guerrilla Painter easel, she also showed me how to set it up and take it down. After her very positive endorsement she also said that I could try it for a month. Wow [insert gratitude here]! What a generous and amazing gesture and what an opportunity for me! Thank you Janet!

I took the Guerrilla out today for a plein air session, and loved the easy setup. The palette space is small, but I had no problem with that. And, I loved that I could put my wet canvas into the lid for portability. This testing an easel is pretty fun! The weather looks cooler next week, my Guerilla painter testing session will continue-stay tuned!

Janet's gesture reinforced my belief in my art friends and led me to pause to contemplate my gratitude for them. Everyday I am thankful for all of my art friends, beautiful wonderful people! Thank you, I appreciate you all!


....


Tuesday, August 9, 2016

Setting Up An Art Website

LESSONS LEARNED: What to do BEFORE you create your website

#1 Set Aside Several Hours to work on your site.
Mine has taken me (just to get basic bones) about 12 hours (4hrs/day over 3 days).


Research
First and foremost who will host your website? What is important to you? How technical are you? What do you hear about Customer Support?

I have been thinking of creating a website for some time (9 months or so). And, I have looked for sites that I like (art websites) and asked my art friends what sites they use. Art Friend feedback counted strongly for the host that I chose for my website - FASO (Fine Art Studio Online).

Domain Name
What will you call your website? Is that Domain Name available? You can Google for Domain Name to verify whether or not it is available.

Art Inventory
What pictures of your work will you feature? Title, Size, Price, Availability all should be documented in an Art Inventory (I use an Excel Spreadsheet). You will have to type in this information, and it is easier if you can refer to your Inventory list.

Quality Photos/Photo Inventory 
Each artwork that you want to feature on your website must be presented in its best light, and you have to have a quality image of said art. Uploading photos is easy, but you again need to have an image inventory from which to choose!

About Me
You should have an Art Resume, if not create one. I imported my art resume into my About Me section. Also here it is suggested that you have a photo of you, another image that you need.

Events
This is an important section, where you should list upcoming art shows. I used a show postcard to add my upcoming event dates and times and I included a link to that gallery. All of this information you should have next to you when you create your site.

Blog
One question to ask is if you can link your existing blog to your website. Or, conversely if you are not or will not blog -- can you hide that option. I cannot tell you how many times I have gone to an artist website, clicked on their blog link only to see a post from 2 years ago-UGH remove that link!

Link To Social Media
You should have an existing Facebook or Instagram or Pinterest to link to -- set this up beforehand. These days an Art Business Page on Facebook seems to be the norm.

CONCLUSION:
As you can see, it is not as easy as "Yeah, just sign up for a website." There is much work that you must put into it.

Here is my website link - which I will warn you is still a work in progress, it still needs more art images. I had to Go Live before I was ready in order to ensure that I got the Domain Name that I wanted. It takes a long time to take a good photo, upload an art photo,  and write a description -- creating an art inventory alone is work! But, if you have all of the above done, it will help you get your website live faster!

Green Handle Art Website
greenhandleart.com


Tuesday, August 2, 2016

Roses in Bloom

Light, Romance, & Roses Abound
English Rose


Lately, I have been focusing on making lighter brighter paintings. Some of this is intentional as I have a show this fall that is in a darker venue which led me to realize that I want to feature brighter works.

While I may not be in love with the English Rose painting, I am in love with the rose in her hair. I had fun painting this portrait. I was focused more on paint strokes and composition than I was features. The model is more petite and soft in real life. I loved how the light hit her braid and how the light hit the flower in her hair - beautiful. Also, I used a huge brush to paint in the choppy background--a new "try" for me. I wanted a loose thick background brushstroke--so I bought a new big brush. I tried to mix several purples to be in the background and I also tried to lay them in and leave them...And seemingly as always, this one looks better in person. Actually this painting style reminds me of two great artists--John Larriva & Malcom Liepke --both are terrific artists whom I admire!
Lost in Austen

My first version of Lost In Austen, painted quickly en plein air was not as good as I wanted it to be. Using photo references, I created this painting which I like much better.  The hat was difficult to paint as it had a veil up behind it, so I had to work to create a transparent look. The features represent the model fairly accurately, although I did put a little more emphasis on her mouth -which I left intentionally larger than reality. Also, hard to tell in this picture, but there is much light on the left side of her face and hair. I went back in and added a really white light yellow to the left side. The strokes in the background were made with a little brush --I like the Van Gogh-ish aspects of this background.
Be Still My Soul

This next scene, Be Still My Soul, is also a bit romantic, although I am not sure about the look on her face.? This is a favorite model of mine and she usually has attitude--which I still feel here even though I wanted a softer look! I perhaps made her gaze too high... Hmmm...And I may change the title, she looks so church lady...

Otherwise, I like the light bright beauty of Be Still My Soul. The hat was awash with light and seemed the brightest aspect of the portrait. I also loved the darks and lights in her hair. And, the rose pattern on her robe was rather delicious... This is the painting that inspired me to get a big brush for background as I had wanted tons of paint and a darker teal; yet when I used my big brushes at home they blended and left lines that I didn't like. So when I went back in to remove the lines, I mushed the background and it became a little light...

Enchanted Summer
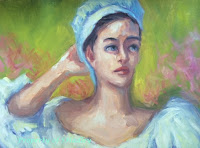
And the latest in the outdoor rose romance series is...Enchanted Summer. This painting does not capture the model's features - but I still like it. Once again, I focused on brushwork and light. I wanted the white dress to be the lightest brightest. I went back in and added cad yellow light to white to the blouse to get a nice white glow (which matches the bright green background). And, I wanted to play a bit with the background--in reality this was painted indoors but I have a show coming up and needed an outdoor background. I added the pink color over the green background, which really helps with the visual interest.


Saturday, July 23, 2016

Cool Days---In Summer

80/Partly Cloudy 

My family and I have a rule that we eat outside and walk outside whenever we can - ala sunny mild days. The last two Saturdays this July have been cool (for summer) and overcast - which means it has been cool enough to be outdoors.

Turtle Bay, Grey Day
We love spending time outside, and love that there are many beautiful parks in our area. Since we have a parks pass, we  take advantage. We have found a favorite large park and even on a busy Saturday at lunchtime we were able to find a quiet picnic spot. After our picnic, I painted while my husband read, a meditative lovely day.

The first Saturday was breezy and cool, with many grey clouds in the sky. We felt lucky to find a nice quiet place by the lake. I set up my easel on the picnic table and painted away. While painting I observed many birds fluttering and chattering away.

For composition, I loved the jut of these trees as they sway out toward the lake. The tree island is my focal point. There were many bright green algae/lilypads on the water in this little cove. And, the trees in the background are nice and dark, far away. I loved setting in the pattern of sky, background trees, lake, island and trees, then lilypad water. The composition pattern was a zig-zag which is not obvious at first glance, but is how I laid it all in. And, lily pads are new for me, I was a bit fascinated with their patterns and shapes, fun!

Hickory Ridge, Grey Day
The Second Saturday was breezy and cool as well, the sky was several shades lighter gray than the previous week. I was also further away from my subject. There was quite a distance across the lake to the first set of green trees.  And once again I fell for the patterning of the lily pads on the water (foreground). In this location the lilypads were a light orange-ish color. I also loved the cove patterns as behind the first set of trees is a break in the water and behind that another break. The furthest set of trees was dark and blue. The lake was bright and light as the sky was very light grey-blue.  Personally I feel that this particular painting is better in person --the painterly brush strokes are more apparent and more appealing in real life! Another reason I am happy with this painting is that I painted it all in one session on location!


Thursday, July 7, 2016

Capturing Emotion

Close Up! Eyes & mouth have it!
Time to Show Some Portraits 

As I look back through my posts these last few months they seem landscape heavy which is odd because I paint portraits twice a week!


Full view, not as successful.
Here are a few recent portraits which I have completed and which for the most part I believe successful. What I am finding lately is that I like some features of portraits but not entire portraits which is a bit frustrating. Each portrait is done in about 2.5 hours.

Full View
I received many compliments on this portrait on the left, particularly about the emotion in the eyes. I do think the eyes and mouth are successful; however, I feel there is too much same color on the face somehow, it looks a bit dull to me. Also, I am not in love with the jawline...hmmmm

The next portrait I was fairly happy with- this is a new model for us, I loved her white hair! Usually with drawing and painting new models, it takes time to figure out features. This time, I was on a limited schedule and worked quickly. I chose purple shadows for the white hair and while that might not make sense, I find it intriguing and think that it works.  And, I love the serious no nonsense Italian Grandmother look on her face! Don't you think that her thoughts were something along the lines of, "I disapprove, now get to work!"? Actually, I think most aspects of this painting from the hair to the robe are rendered successfully. Often I render lyrical sweet paintings; this particular painting is nice because of the serious line in her mouth.


That earring!
Love the Hair!
My issue here is with that darn earring. It was a sparkly yellow green chandelier which I found very appealing, but I am unhappy with the way it turned out. For the earring there was a light bright side and a dark side and lots of shine, but here, I think perhaps it is too defined. I wish it had been done with less strokes -more quickly! Ah - improvements/lesson learned for next time.

I find that the close ups on this page are more attractive to me than the whole portraits, that is something I will really have to think about...